Monday, April 27, 2009

new seedlings


I think I have some clues as to why some of my radishes are not fully developing. If you look closely at the picture you'll notice that the outer parts are dry and they slope inward towards the center which is nice and moist. I need to make sure the soil is level all the way across and I remember I didn't rake my box before planting. I just patted the soil down with my hands. Another live and learn example.
So using the above mini greenhouse I've started more seedlings(three days ago):
3 black krim tomatos
3 chives
6 butterhead lettuces
6 nasturtiums
6 swiss chard
6 cosmos
6 peaches and cream hollyhocks
6 cleomes
6 leaf lettuces
6 morning glories

I really like this jiffy pellet system because of the ease of use and how neat they are. I tend to be quite messy when I use the multi-cell containers and dirt system and plus I start my seedlings in a room in the house that is not meant to handle dirt and water. I quickly vacuum and wipe any dirt/water that may fall on the hardwood floor.


I think my butterhead lettuce are coming along beautifully. There always seems to be a runt lagging behind, but I've learned not to give up on them because eventually they grow to full size and go on to contributing to an enjoyable meal. What I'm learning is that gardening teaches good lessons about life.


I've planted some cascading petunias, alysiums and climbing black-eyed susans. The latter are in a bit of a shock since I didn't harden them and the fluctuating temperatures. I do cover them at night for frost protection. I think they will do just fine.

Eighteen more days till my last frost day of May 15th arrives. My garden window is bursting at its seams with two feet tall tomato plants and more. I may even have some tomatoes growing on them even before I plant them outside. The flowers are opening up and I'm just waiting till they are completely open so I can begin pollinating them.


Thursday, April 23, 2009

Coldframe in progress

I was having some doubts as to the size of this coldframe...it's so large, but as you will see further down, I filled every inch of it.


Since we didn't dabble in carpentry till we started gardening, our tool collection had been very minimal. So as I mentioned before we borrowed a circular saw and we did manage to get the wood cut without getting injured, but we couldn't figure out why the saw would kick back or not finish cutting the wood completely. We had a friend do the diagonal cut on his table saw and he mentioned that it helps to have a sharp blade. That's when we realized we had been using a dull one. Live and learn.

Coldframe with unfinished lid. It still needs the hinges, chicken wire, plastic and lid propper.
I was happy this morning when I realized I could shelter my plants from the wind in my unfinished coldframe.
I'm considering painting the box with sealant to extend the life since it wasn't built using redwood or cedar....I think it was pine. When I'm done with the box for the season, I can easily take it apart and store flat.
Cost of box $60.
Hubby making the lid.

Monday, April 20, 2009

More

So because of my radish failure I'm convinced that my soil needs a lot of humus. Not only because of that incident but because these raised beds are brand new. So I decided to give my beds a super jump start since it's going to take a while for the compost in the bins to breakdown and I'm not going to spend anymore money on this garden(at least for this season.)
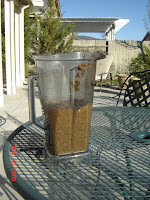
I took what I had in my kitchen bin, eggshells(calcium), rotten bananas(lots of potassium), plantain peels, oatmeal and veggie pieces and I put them in the blender with some water and viola! ...and with the help of the soil microbes this vitamin concoction should be readily available for my plants.
The "shake" ready to be mixed into the radish bed( I know it looks gross.) I also removed some little pebbles and sprinkled a small amount of Epsom salt and planted my radish seeds. I hope it works, and if not I'll keep trying till I finally get it, b/c I love radishes.
This is my lumpy compost. I believe I can avoid the lumps next time by constantly maintaining a 1to3 nitrogen to carbon ratio(that is my educated guess.) I had to many greens at the beginning and not enough carbons. Does anybody have any input about the lumpy dilemma?

Tiny Radishes

As you can see, my first harvest of radishes are just tiny. I'm not too disappointed since you can grow them so quickly. I did a little research on the internet and found on gardenweb that stunted radishes can be due to ...too much nitrogen, low magnesium, and/or erratic watering(they need constant moisture.) I also checked some of my reference books, including my Jerry Baker gardening books, and he recommends epsom salt use in the garden.
So before I plant new seeds I will add more compost and mix in a small amount of epsom salt and add more mulch. We'll see if this works.
I also read about dropping a small handful of epsom salt where you are going to plant your tomatoes. Apparently tomatoes are heavy magnesium feeders and this prevents yellowing of your tomato leaves.


Eggplants.
The one on the far right is doing much better than the ones on the left. The ones on the left were planted in a smaller container and were root bound. I did transplant them and provided them with seedling food to reduce the shock. I placed them indoors to let them recoup.

Sunday, April 19, 2009

Gorgeous Day

Today has been a gorgeous day and I was so excited about building the coldframe but unfortunately I didn't get very far. My brother-in-law let me borrow his circular saw but I have to say I'm a little intimidated by it and I'm usually quite comfortable around tools. I don't have the right table for it so I placed the wood on two chairs and I was going to proceed and make the cut in the middle, but it is unstable and I have no one to stabilize the wood for me at the moment. I will have to wait till Mr. H gets home. I also tried using my jigsaw but the wood is so thick I don't want to overwork it.
I also wanted to staple my trellis up on the box frame but I ran out of staples. That will have to wait too.

Some pictures I took today:


Some of my peas


These are just three of my tomato plants out for some sunshine.
One month to go before I plant outside.


Shallots


Rapa centroventina. I received the seeds from wintersown.org
I've never had these greens before, but I've read that they are very nutritious and bitter, so you'll want to cook, steam, or saute them.


I found two of these mushrooms in my garden this morning. I think my boxes are getting too much water from the sprinkler system. I will have to cut down on the time. Do you guys agree that this is a mushroom?
One thing I do want to share regarding mulching with straw is that you will end up with straw weeds. Luckily it doesn't take much to weed with this squarefoot system because you can just tell the weed doesn't belong there when it pops up in places you didn't plant anything in. So think twice beore deciding to use straw or hay to mulch with. I do like how it looks though and right now it give me something to do in the garden.

Tuesday, April 14, 2009

Spring Snow and more


My garden received about 1inch of snow in less than one hour. My heart sank when I saw the snow; it's like I'm afraid of loosing what I've put so much love into. I know I have to get over this feeling, because I know there will be many times when I won't be successful. I'm hoping this will be our last storm of the spring.
The thin polyester fabric amazingly enough did manage to keep my crops from freezing. I am convinced that it does work. It felt much warmer under the cloth when I stuck my hand underneath,
but for the 50mph winds that we're expecting tonight with 20 degree temp , I felt I had to go one step further to protect what I have. I purchased a roll of 3.5 mil plastic from the hardware store and placed it over the garden with the pvc pipes in place.


My new covers. Much nicer than those old sheets. As you can see the snow didn't last very long, it quickly melted.


My wheatgrass is ready for juicing.


I am convinced that a cold frame would make my life much easier as far as sheltering my seedlings from the weather and for hardening off my plants. While I was at Home depot today, I decided to price out the cost of all the materials for a cold frame. I thought I was going to have to walk around a lot, which I knew I wouldn't be able to do in one visit. This nice man came to my rescue. I gave him the list of the materials and we went to the contractor services desk. He searched for all the materials on the computer and printed out a merchandise list and summary which includes the price...then he told me that he could have it all ready for me tomorrow morning. All I have to do is pay over the phone and drive up and pickup my merchandise. Sweet:), That will save so much time. The man told me that this contractor service is always available. I thought I'd share the knowledge.

I am looking forward to sharing some pictures of the building of my cold frame. I'm using the plans from Bob Thomson.

Sunday, April 12, 2009

Flowers, wheatgrass and herbs


The last frost date for my region isn't till May 15, but I just couldn't wait till then. I planted some flowers in a pot right outside my front door. I figured that if the temperature drops to freezing I can easily cover it with plastic or some old bed sheets.


I started these plants from seed. I have here three allyuims, two pearl petunias and three avalanche petunias(cascading types) from Park seed. I have more pots that I can start, but this seems to have quenched my desire for planting for now.


2 purple basil seedlings
1 larger green basil seedling
4 oregano seedlings
I'm waiting till May 15 before I plant these in my garden. Out of all my plants and seedlings, these are the only ones I took out for some direct sunlight, I have too many to be carrying in and out of the house. I wish I can just drive them in and out of my garage in a pick-up, like Annie does(clever idea.) Hopefully soon I'll be able to build a coldframe so that I can harden my plants in.


I just want to share a picture of my wheat grass growing. I started this about four days ago. I simply placed some wheat berries on this tray and I spray it with water a couple of times a day. It will get pretty dense and look like lawn. Then I'll cut it and stick it in a blender or wheat grass juicer. Apparently, it is such a nutritious drink that only 1 or 2 oz is all that is needed to drink in one shot.


Saturday, April 11, 2009

Garden Girl Tv-Patti Moreno

I just wanted to write about Patti Moreno. I found her on youtube one day when I was looking for information on caring for blueberry bushes (I wanted to learn how to take care of mine) and that is when I fell in love with her videos. They are professional, informative and interesting; I was quite impressed to see her make her own chicken coop using drills and other tools. She inspired me, I thought, hey if she can do it so can I.
Do you want to learn how to garden, put together a shelving unit for seed-starting, make a chicken coop that will fit over your garden boxes to fertilize your soil or shave your rabbits and make yarn and more...well just tune in to Patti, she will teach you how. I have to say that I've learned so much from her videos and they have been a source of inspiration to me. ...and that is why I have a widget linking to her website. So stop by and check out her website . No I'm not getting paid, but I'm hoping that she will send me some seeds and if she doesn't I'll still keep the widget.

By the way, I will soon be sharing some pictures of me setting up a patio garden box w/ legs for a friend. She was concerned about having to bend down to garden so we've ordered a waist high box from the square foot gardening website and she is so excited . At 84, she thought her gardening days were over. So I'm really excited about helping her get started. We are just waiting for it to arrive in the mail.

Thursday, April 9, 2009

Medley


I'm snuggled on my couch writing this post. It's cold and cloudy and I've no desire to step outside. I'll wait till that window of sunshine comes through the clouds before I go out and check on my plants.


I did manage to re pot my tomato plants into 1 gallon containers. I planted them deeply into the pots removing the lowers leaves so that I can get more roots from them. It's helpful with those tall lanky plants, I only had two of those. and they are much more stable now.

The recycled pots were courtesy of Dry Creek Nursery on S. Virginia ave. They were kind to give me some old plastic pots and trays when I asked them for them. They just told me to come back and shop there. I was going to do that already because I like it there. Small friendly atmosphere with all the stuff I need. I was impressed to see their heirloom tomato plants when I walked into their greenhouse; they even have tomatillo plants. I'll have to wait till next year and incorporate them into my garden b/c I don't have any more room this year. On second thought, they grow pretty well in containers and I have plenty of those. They also carry onion plants and sets and more.


I just want to show you the progress on one of my kale plants.

It's doing great. I have lots of other types of seedlings surfacing but they are too small to really appreciate in a photo yet. I think if you click on this photo and look towards the top you'll see some shallots have surfaced.


Liisa, thank you for dedicating one of your post to answering my question about the hoops. I purchased 12gauge electrical wiring (they didn't have regular galvanized wire at Homedepot and I didn't feel like driving all over town) and made some low-lying hoops to lay the fabric on. I need to adjust the wire length some more but it held up through some strong winds we had. The fabric didn't hold up, I had to lay it flat on the beds and hold it in place with rocks... but when the fabric is setup over the wire it create a greenhouse environment...so pleasant inside . The fabric disperses the light, offers pest and frost protection well worth it.


This compost tumbler I purchased on Craigslist last fall. It is very easy to move to different locations and to rotate. It does have drainage on the bottom so you either have to catch the tea with a tray or let the tea fertilize the ground. It's been full for about a month. When It rains the water seeps in and makes the contents soggy so I add more straw and newspapers and that helps with the odor. As far as the odor if you add enough "browns" it shouldn't stink. I don't think I was adding enough. I'm slowly getting the hang of it.


With my green tumbler full, we weren't able to compost anymore so I needed to get an additional bin. A pile in the yard was out of the question with Coco ready to dig in. So I got lucky again and found another bin on Craigslist. It's much bigger than my green one and no it doesn't rotate but I like it just as much. I'm not planning on turning the pile. I will do the french compost method: layering kitchen waste, yard waste, dirt(need those microorganisms) and water.

Monday, April 6, 2009

Tomato Scare!...FalseAlarm.


This evening I went to check on my seedlings and found the leaves on one of my tomato plants all curled up. I thought...oh no...I'm losing my plant to some viral disease, but I also noticed that the peat pot it was housed in was bone dry and when I turned it over some of the roots had outgrown the pot. So I watered all of my tomato plants quite generously(and here I was trying not to over water.) I have to remember that peat pots lose moisture much quicker and that tomatoes are water guzzlers. So I checked on my plant an hour later and the leaves had mostly uncurled, as you can see from the picture. Whew!!! I don't have much room for error. I have a total of 12 plants...six for my garden and the remaining I've gifted to some friends and family.


"Evidence of Neglect"

Tomorrow I will be repotting these.


I'm just admiring my plant... like the proud mom of a newborn.


I just wanted to show you a picture of my sprayer. I love this thing. I use it to fertilize my plants(spray the leaves)...mist my little seedlings...and my worm bin. It makes my life easier and yes It's my toy...but I have to admit that my little tomato fiasco occurred due to relying on the sprayer to provide all of the plants watering needs. It just doesn't spray enough. You'd have to stand there long time spraying the plant, which just isn't efficient. I'll stick to my watering can.

Friday, April 3, 2009

Spring Wonderland

This is what I woke up to this morning-a beautiful spring wonderland. I had a hard time removing the sheets off the hoop; they were frozen solid. I could have easily cracked them into pieces. Yes I'm still using those old sheets. Yesterday I bought a protective garden cover to protect from heavy rain, frost and more... and you would have thought I'd used it last night. Well, I'm trying to figure out how to lay it on the hoop. It's 5 ft x 25ft so I'm thinking I may have to cut it and sew it together to make it square. I need to decide soon before it warms up; I don't want to give the cabbage worms and loopers the opportunity to setup residency in this box full of greens.


My first shallot seedling. I had it covered with a salad container last night. I don't think I really needed to cover it, but as a careful and inexperienced gardener, I'm babying all my seedlings. I do have a couple of other onion plants which I rescued from my compost last fall.


This was one of the decaying onions from my composter. It is now a beautiful onion plant. Hopefully I will get to harvest an onion from it. I'll show you what I end up with when that time comes.


Here is my completed worm bin. I made them a "milk shake" of decaying bananas, lettuce and apples. I'm sure they had a feast. As you can see, they still have room for growth because
there's six to eight inches of height for them to occupy and fill full of worm castings. I'm going to wait till it's full before I harvest.


This is how I covered my bin last night. It's not covered with snow because I cleaned it off prior to taking the picture. I wasn't' thinking.
I think the worms survived because it was much warmer in the bin.


I'm really enjoying this book by Bob Thomson. It's full of tried and true gardening tips and information.... and the pictures are great. I believe a valuable gardening book not only has to be resourceful but it has to have great real life pictures...and this book has that. The soil pictured in this book is the type you dream of...black, rich and full of fertile matter. The chapters are divided by months with tasks to perform in during that time period. He also includes plans on how to make a coldframe, bean trellis, composter and more. I highly recommend this book. You can check this copy out from the Washoe County Library...of course, you'll have to wait in line or buy your own copy.